When you are putting on a show or event the production value is very important. Having great sound and lighting will up the production value of any show. People need to hear (see my blog post on Sound Systems for more details) and see well. Lighting is probably the least understood and most overlooked aspect of an event. Maybe you don’t have access to a beautiful theater, or a big budget to bring in a production company for every event, but you want to make your events look fantastic. If so then read on, you’ll have to spend a little money but that investment will be repaid for years to come!
Why is it when you go see a musician or theatrical production in a well equipped theater that you get this tingly feeling of excitement when the house lights go down and the stage lights come on? Sure you are excited for the show, but a big part of that feeling is the atmosphere the stage lighting creates. Just the act of turning off the house lights creates excitement and anticipation. Then when the “special” stage lights come up so does the excitement. In addition to setting the atmosphere, lighting tells the audience what is important to look at. It helps the audience focus on what they should be focused on. They will be less likely to talk to their friends or look at their phones. They will be drawn into the performance. Over the years I have performed in thousands of venues from outdoor stages with the sun as my lighting, to cafeterias with just room lights, and beautiful theaters with incredible lighting systems. Each one of these settings has a different feel to it, and the lighting is a big part of crafting what you want your event to feel like.
Colors
The color of your lighting can create different moods and emotions depending on what you want. You can use warm colors like reds, yellows and oranges to make the room feel warm and cozy. Or you can use cool colors like blue and green to make things feel more orderly and secure. Those colors can be applied to uplighting on the walls around the room, as back light on the curtain of your stage, or as the light illuminating your performer. Then there is white. White light seems simple right? Not quite. There is a range of temperatures a white light can be measured in. White light is measured in kelvins and is abbreviated as ‘k’. A 3000k white light will be warm like a candle light or a traditional 60w soft white bulb used in most houses. A 5500k white light will look more like bright sunlight, and might start to look a little blue. When choosing a light for your performer I think lighting them with white lighting in the 4000k-5000k range is the sweet spot to make your performer have the most natural look.
Lighting a Performer
The most important light for a performer or speaker on stage is front light. That means lighting that is pointed at the performer with its origin over the audience. This light will make sure the audience can see everything that happens on stage. Usually this is a white light. Like I mentioned I think lighting a performer on stage with white light in the 4000k-5000k range is the sweet spot to make your performer have the most natural look.

Here is an example of common lighting choices you will have with LED lighting systems. This is an example of an RGBA system. R stands for red, G for Green, B for blue and A for Amber. Each light can be any one of these colors and all of them at the same time, and you can mix different colors for the look you want. If you turn on the red, green and blue channels to the same intensity level you will get white, because white is made up of all these colors. If you just use amber then you will get a very soft white color (amber). Try experimenting with amber at 100% then put the red, green and blue channels at 50%, it will add a cooler tone to the amber. Then try 75% and 100% to find the perfect white light for your performer.
Why room lighting doesn’t look good
Regular room lighting would be considered down lighting because the origin of the light is coming from the ceiling and projecting straight down on the performer. When just using down lighting you run the risk of creating shadows in the performers face and anything else on stage. The most obvious shadows created by down lighting are in the performers face and eyes. Having shadows in the performers eyes doesn’t look good and hurts the performer when they are trying to connect with an audience. Here’s quick experiment to do for yourself right now. You are probably in a room with lights coming from the ceiling. Hold your hand flat in front of your face, little finger towards the floor and thumb on top. The palm of your hand looks well lit right? Now start rotating the thumb side of your hand towards your face so your hand is at and angle. See the shadows start to form on the palm of your hand? That is what happens to a performers face, eye sockets and objects on stage when you are just using down lighting to light the performance space. Shadows are not good, unless you make a conscious decision that you want shadows for the look and feel of your show.
Backlight
Ok now you understand the importance of front lighting, if you just get decent front lighting then that will make your performers and events look 100x better. To up the game even more you might want to add some background up lighting. This type of lighting helps create visual space between the performer and whatever background they are performing in front of, so they don’t look so 2 dimensional. If you are in a theater you will probably have access to some lights set up specifically for this, these are usually hanging above the stage. If you are setting up your performance space on a portable stage then you will have to set up your own. This light can be a colored or white light, depending on the lighting you purchase. I would recommend using a blue uplight for most performers but experiment and try different things! Some performers have a color they use a lot in their branding and may like that color, or a complimentary one as the uplighting.
DMX Basics
When shopping for lighting you will hear terms like DMX and channels. Don’t let them scare you away. DMX is a protocol for communicating with lights. It's not a language but it's fine to think of it like a language. DMX consists of addresses from 1-512. You can assign an address (a number from 1-512) to a light (or a color on all lights), then control it’s intensity (brightness) using that address. You can also control other things like colors, and movement (if you have moving lights) using DMX. You can have more than 512 addresses but that’s more advanced and beyond the scope of this article. DMX cords are traditionally 5 pin but the equipment I will recommend in this article will use 3 pin DMX cords.
On the lighting system I will recommend there will be a setting on the lights called 4chan (4 channels, there is also 3chan and others depending on what you buy). This will allow you to control the lighting through DMX commands (a lighting board can send those commands). On the lighting equipment you can set the address you want to start on, for this example let’s start on 1. That means for an RGBA (reg, green, blue, amber) lighting tree the color red on every light will be controlled by address 1. The color green on every light will be controlled by address 2. The color blue will be controlled by address 3. The color amber will be controlled by address 4. If you get the 4 channel lighting board I recommend below, you will be able to control each color on all the lights with one slider for each color.
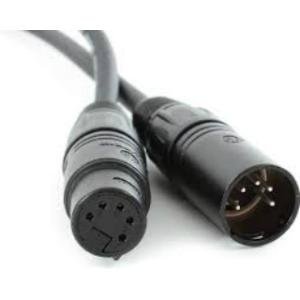
5 pin DMX cable.

3 pin DMX Cable
Equipment Recommendations
Light Tree
For your portable set up I would recommend buying two of these Chauvet lighting trees. The reason I would go with this one over the less expensive models are that this one has an amber channel which will allow you to get natural looking white colors (remember 4000k-5000k white color temps?) and will give you natural looking skin tones of your performers. You will need two of these. One set up at an angle and on the left side of the stage and one set up at an angle on the right side of the stage. Both trees can be positioned around the 1st-3rd row of chairs in the audience.
Uplighting
If you want to up your game even more, I would recommend picking up 4 of these units and set them on the floor right in front of your curtain or back wall and point them up at the wall or curtain. Each unit is 40” long which is 3.3 feet. Most stages will be at least 12 feet wide so by getting 4 of these you can cover the whole width of the stage. But you can get away with 3 of them on a 12 foot wide stage.
https://www.sweetwater.com/store/detail/COLORBandQ3BT--chauvet-dj-colorband-q3-bt-rgba-led-bar
Lighting Board
The lighting tree I recommend comes with ways to control the lights like foot a pedal and even through a bluetooth connection on your phone. I think the best way, especially if you will have to teach different students every year how to use it, is to buy a simple lighting board. This is the board you will need. You can daisy chain (connect the dmx out to the dmx in) of every light and run the dmx cord to the light board and control every light from this. Don’t forget to pick up an extra long DMX cord so the board can be set in the back of the room.
https://www.sweetwater.com/store/detail/Obey4--chauvet-dj-obey-4-16-ch-dmx-lighting-controller
DMX Cords
Make sure you pick up a few long DMX cords so you can set the light board at the back of the room or at least somewhere off to the side of the audience.
Summary
To make your performers and homegrown events look great you will want some basic lighting. You will want front lighting and possibly uplighting at the back of your performance space. It’s as simple as that. Don’t be afraid to play around with the equipment. Order your lights, set them up, read the instructions and start playing with them. You won’t break them by experimenting! I bet in an hour or two you will understand and feel pretty confident working with them. Have fun learning this important new skill!
If I can answer any questions or be of any help, please don’t hesitate to reach out to me at info@peterboie.com